I made a quiet book for Lydia (and all my other future children/grandchildren) a little over a year ago. While it started out as an exciting and fun project, it definitely finished as a "let's get this thing over with!" project. I researched a lot of different ways that other people did their quiet books and decided that this was the way that worked best for me and my needs.
My main inspiration for how the book was made was the one that my mom made when I was young. She used muslin for the pages. I preferred this to the felt pages I saw other people make because I figured that if I was going to put work into this, then I wanted it to really last a long time. Felt will pull and get all ratty looking after being used for a while. Especially with all the velcro! She cut the fabric so that you had 2 pages on a long sheet of fabric and then you sewed the top and the bottom of the pages together right side together, turned it right-side out and then serged the last side. I also ironed medium weight interfacing to the pages to help them hold a little more stiff.
It took me a long time to narrow down what pages I wanted to do. There are so many ideas out there! I wanted to include a good variety of learning skills, but also have it entertaining and cute (very important to me :). This is what I came up with.

Noah's ark page. I found a similar design from someone else's book on the internet. I changed it up a bit. This was my first zipper I've ever done. I think it turned out okay! I used a thick almost faux leather type material for the ark (it was from my mom's scrap bin that she used for a vest for my brother years ago). It was fantastic because I didn't have to finish any of the edges because it didn't fray at all :). So, that made the zipper much easier to manage. The main thing that I would change is that I pretty much only made the pocket for the animals using the ark. If I had thought it through a little bit more, then I would have connected it more before-hand so that the water could also be part of the pocket and made it much bigger. As it was, only these 4 animals could fit inside. (Finger puppets from IKEA). But I like it overall. And the water is scraps leftover from when I made my prom dress in highschool! Fun to have those little sentiments in it!
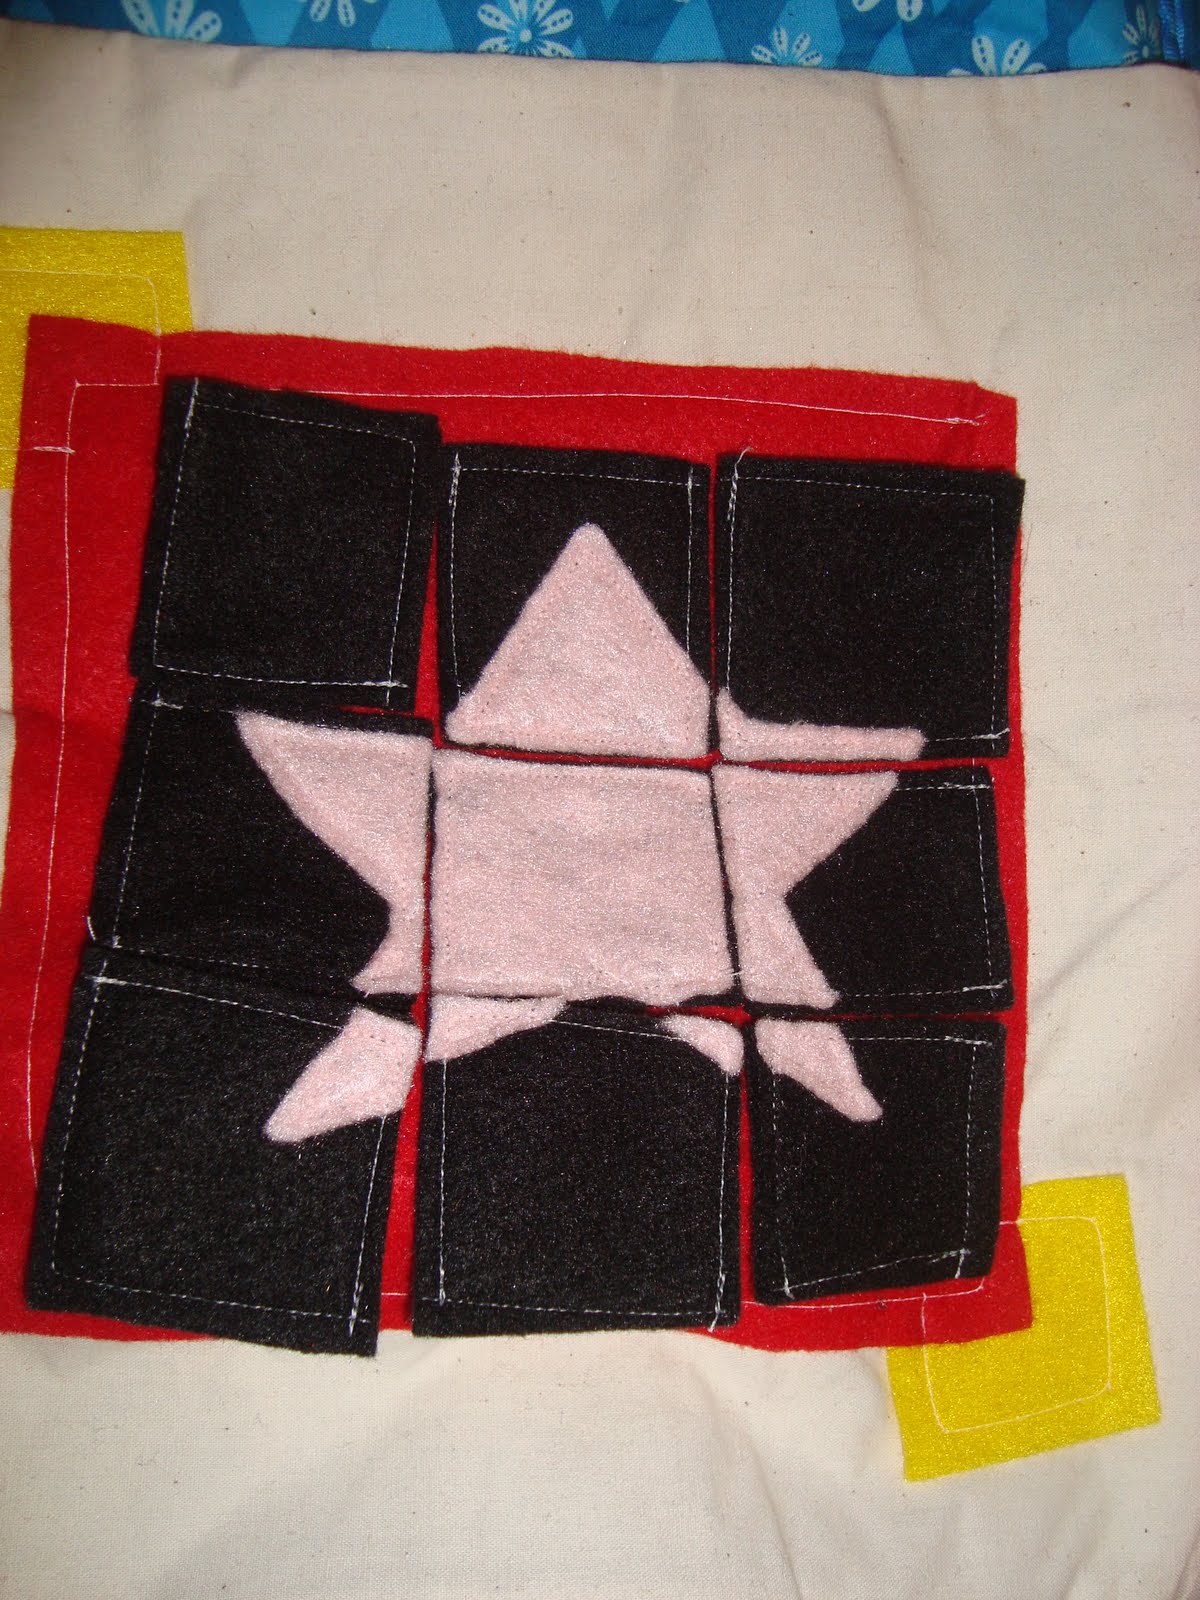
The next page I decided to make a little bit more churchy, since that is the main place where the quiet book would get used :). I decided to do puzzles of the 3 Degrees of Glory (Star=Telestial Kingdom, Moon=Terrestrial Kingdom, and Sun=Celestial Kingdom). I varied the puzzles in difficulty level. The star is still a little tricky for Lydia, but that should help keep her interestas she gets older. I double layered all of the felt so that it would be more durable over time. And I didn't use any velcro or anything sice I put in a felt puzzle mat and they stick to it just fine.


And this is on the opposite page of the puzzle mat to store them all. Simple envelopes made from leftover fabric of a 4th of July dress my mom made me when I was like 5 or so. Fond memories of that dress!

I really like how these flowers turned out! The petals are each a circle of fabric folded into 1/4ths, stitched in the middle to 2 circles of felt (sandwich style) and then trimmed to look more like flowers. I didn't finishoff the edges, just used fray scheck and its worked great so far! Lydia loves this page and is learning how to button things really well right now, thanks to this page!
(That white with pink polka dot fabric is also from an Easter dress my mom made when Brittany and I were young).

This page is also coming in handy right now as Lydia is learning to buckle. I found the template for the sneaker online and then used the template and my own creativity to make the Mary Jane. If I re-did it, I would double over the felt for the buckle strap on it or use a more leathery fabric for it because it feels weak and I fear what will happen to it soon! I need to figure out a way of fixing it soon (but haven't figure out how since it's sewn to another page). I also included a simple D-ring "belt" for Lydia to practice. She has several belts that are this style.


I still haven't really finished this page how I want it. This was one of the last pages I made and I was definitely losing my thunder! I couldn't figure out how I wanted to make the tic tac toe pieces, so I just used some leftover flowers I had and said that solids were one team and polka dots were another. They are pretty flimsy and are falling apart, so I need to figure out that one soon. But I think Lydia will figure out this game soon and will enjoy it.

Lydia is actually starting to get the hang of this page now :). This is a simple snapping and matching colors/shapes page. Once again, I doubled the felt to make it more durable. One thing I would change: bigger snaps.

I love how this page turned out! (Well, minus the hands of the clock. I still need to figure out that one!) Initially I just used a foam sheet to make the hands, but the hour hand was pulled off very quickly. So, I wouldn't recomment that. I think I'll try layering fabric with interfacing and maybe doing a button hole to attach it on. Any other ideas?

I like how this page turned out for the most part. This is meant to teach Lydia more about money. I plan to label the different things for it and the percentage of money that should go in each. But there is a tithing envelope for her to figure out her 10%, her savings piggy bank to figure out 50% and then her purse to hold the extra. The pig is only attached to the page on the top 2/3 so that she can easily retrieve money put in through the button hole/coin slot. The fabric is also backed with felt to make it more sturdy.


This one is meant to be a counting page. Lydia has enjoyed playing with the beads on it and is now starting to learn counting them. The numbers are simply attached using heat n bond.

This is one of my favorite pages! It was one of my own creativity :). Maybe that's why I like it so much. But it also turned out fantastic! We live so far away from most of our families that I wanted Lydia to learn who they all were. So, the middle column is a picture of the Savior, our family and the First Presidency. The left column is my family (Parents, Blake's family, Eric's family, Brittany and Neil) and the right column is David's family (Parents, Josh's family, Drew, Adam and Matt). Isn't it convenient that both David and I have the same number of siblings?! This one already needs to be updated considering there are 3 babies not pictures on it (including Hannah!), but I made it easy to update! The pictures are each in a simple vinyl envelope that I can easily swap out, but not so simple that they fall out :). I love it! And I love having the temple representing that our families are eternal!

This is my next favorite page! It is another one of my own creativity. I wanted to include things in the quiet book that would be personal and represent our lives right now. So, what better than an island since we live on one! There is a key buried in the sand (a button hole) that can be used to unlock the treasure chest! And what is inside the treasure chest?

Mardi Gras beads! So perfect for Galveston! I love it!

This is a page that was inspired from my mom's quiet book, but needed some improvement. My mom used felt for the weaving strips, but they have become so stretched out and frayed. So, I made sure to use fabric instead. Lydia still hasn't grasped how to do this page. But, I'm glad that there's still good room for her to grow with it :).

I just had to include a road page! And I had to make it a little personal to our lives right now :). So, the entire bottom of the page is Seawall. Originally I was going to put umbrellas along the sand, but that was a little too complicated and I'm not that great with the paint! The major improvement that this page needs is the parking garage to store the cars. Still need to figure that one out! I made it too small/big so the cars just fall out.

This is our strip of townhouses that we live in right now. We're the brownish one :) And maybe we can pretened that the grocery store is Arlan's :)

And the hospital, of course, is UTMB :)

And a simple Peek-a-Boo page :). Once again, the picture is in a vinyl envelope, so I can replace it when I want. I should put a cute one in of Lydia and Hannah together now.

What it looks like with the tablecloth down.

This one is a fun little dress up page. Yes, the girl does have psycho hair, but it's fun :). There is a laundry basket that holds the clothes and a clothesline that also hangs them. The clothes are just fabric attached to interfacing and stitched around the edge with cute designs on them. I was having fun playing with the various stitches on my sewing machine :)


I really don't like this page, but I don't really know how to fix it. I like the hair and that she can learn to braid. But I didn't know how to do the girl's face and messed up while painting. So, in my efforts to clean up my mess up, she looks like she has a black eye. I'm not an artist! I would like to completely re-do her face, but don't know how I would attach it with another page on back. Any ideas? Anybody feel talented and want to make me one?

And the final page is just a simple little purse and some pockets to hold pencils/crayons. This is a very simple, yet incredibly necessary page! I think it may hold Lydia's attention longer than any of the others :).

And finally, a few more details on how I put the cover together. I decided that binder rings was the way to go so that we could take pages out as needed to share with multiple kids. And I could also add to it if I ever feel the need. (I don't think that's going to happen any time soon!) The rings are attached by simply sewing a ribbon to the middle of the cover and leaving gaps in the right places for the rings to slide through. I re-inforced my stitching a lot on this part!

I chose a fun, kid-neutral cover so that if I ever have boys, they won't mind playing with it too :). The cover was made by sewing some heavy intervacing to one side and some batting to the other and then putting them all together. I wanted to make sure it was big enough to fit all the pages inside, but ended up with it a little bit bigger than I would actually like. In the future, maybe only add an inch total to the height of the book so that the pages are inside, but the cover isn't much bigger. I'm not sure how much I added, but it seems super big. Then I just added a button closure for it.

And a simple pocket for the back to hold any loose pieces that we find :).
Overall, I love how the book turned out! It was so rewarding to finally be done! However, it was NOT a small project! I think it's wonderful to have a personal quiet book that I can use for all of my children and hopefully grandchildren. But I would NEVER do it again! I worked on it for several months and long afternoons. I would recommend starting before your kid is old enough to use one, and then working on it gradually. Then you should be done by the time they're 2 or so and can use it. And I definitely recommend making one that will last. If you're going to put that much time and effort into it, then you want it to go a long ways!
Also, I don't mind if anyone wants to copy my ideas for it. That would be fantastic! I would be flattered if people actually found my ideas inspiring :). However, this is a personal, family blog. So I do ask that if you choose to pin it, that you do it on your secret boards! I would prefer not to make my blog private (I find it annoying having to give everyone I want a personal invitation and having to sign in to look at it!) So please respect my privacy :). Thank you!

2 comments:
You're right, it's inspiring. I forgot how amazing that book is! I have had dreams of making one, but I just don't think I would enjoy it at all. And Abby really doesn't give me much extra time to do things at all. I decided to settle for a making her a cloth book made from the panel fabric. Maybe I will change my mind later (or have more time) later. In the meantime, you're amazing.
The thought crossed my mind once to make a quiet book. But then it left, almost as quickly as it came. I don't think I could ever be devoted enough to a project of that magnitude. So go you for finishing it! I hope it gets the use it deserves for all that hard work. :)
Post a Comment